
No products added!
Tufting is an artistic work that has gained popularity among people in recent years. It is an art that enables you to create custom rugs of specific designs, colors, and textures. In every aspect, whether you are considering placing your tufted rug at home or selling a handcrafted rug, tufting offers endless opportunities.
However , if you are starting and want to learn how to tuft a rug, this blog is for you! This will help you understand what tools and materials need to be used along with various techniques on how to make a rug.
Essential Tools and Materials You Need for Tufting
Before you start, there are some essential rug tufting tips, tools, and materials you need to know:
- Tufting Gun
There are two main types of tufting guns:
- Loop-Pile Gun: This gun places loops of yarn on the surface of the rug, which gives the rug a softer and cushion-like feel.
- Cut-Pile Gun: This type of gun cuts the yarn while it is being forced or pushed through the material, which creates a more sharper look.
Many beginners prefer the cut-pile gun as it is easier to handle.
- Backing Fabric
You will require a strong type of fabric that can hold the yarn while tufting.
- Monk’s Cloth: This is one of the most preferred fabrics for tufting owing to its close weave and strength.
- Primary Backing Cloth: This fabric gives a woven look and a solid base.
You have to make sure that the fabric is properly stretched on your frame to ensure wrinkle free formation.
- Yarn
When selecting the yarn for rug tufting, use yarns which are durable and also thick like wool, acrylic, or cotton. The thickness of the yarn used in the making of the carpet determines the texture or feel of the carpet. Although wool has advantages, due to its durability and softness, synthetic fibers like acrylic are cheap and easier to get.
- Tufting Frame
The main equipment is a tufting frame to stretch and fix the fabric properly while tufting. They are available in stores, or you could construct them from wood and clamps if you have time to do it. Make sure to secure your backing fabric that fits to the frame and stretch without giving wrinkles.
- Carpet Glue
Finally, you have to apply glue on the back of the rug, and this will ensure that the yarns stay in order. This ensures that they do not come loose or unravel. Choose glue that is formulated for use on carpets or very dense materials such as heavy fabric.
- Rug Scissors or Shears
After the glue is set, you will be required to use sharp scissors or shear to remove the extra yarn from the rug. With shears, you can generate certain lines on your rug designs and patterns.
- Lint Roller or Vacuum
Most of the yarn and lint will remain on the rug’s surface after the tufting process is complete. A lint roller or vacuum will help in cleaning the rug and provide the finality of the professional work.
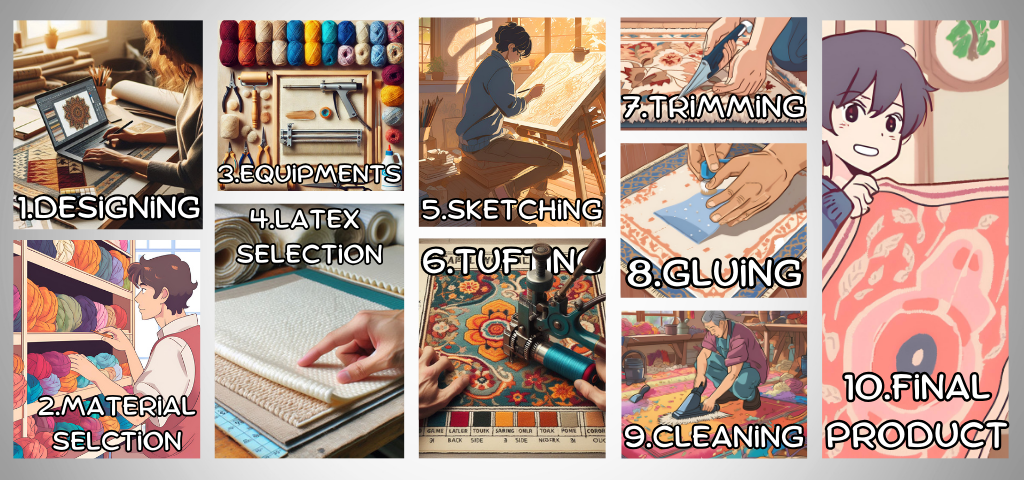
6 Steps to Tuft Your Rug
Step 1: Prepare Your Design
You can sketch your tufted rug design ideas on paper and trace it on your backing material using a marker pen. Using a design that may be intricate, place the pattern of the design on the fabric through projection.
Step 2: Set Up Your Frame and Fabric
Take your backing fabric of choice (for instance, monk’s cloth) and stretch it over your tufting frame so it becomes taut. A stretching of the fabric to the optimum level ensures an even surface for tufting.
Step 3: Thread Your Tufting Gun
Read the manual of your tufting gun on how to thread the yarn through it according to the instructions given. Usually, yarn goes through a loop on top of the gun and the needle in front.
Step 4: Start Tufting
Start tufting according to your design. It is recommended that a steady and slow hand is used and that the gun is held at a fixed position to weave the yarn into the fabric using the trigger. Start with outlining and continue with the basic shapes. Consistent speed and pressure will lead to a level surface.
Step 5: Glue the Backing
After tufting, flip the rug and apply glue to the back to hold the yarn. Apply it in all tufted zones to stick well and wait for it to set.
Step 6: Trim and Finish
After the glue has been set, use a scissor or shear to cut off any additional yarn and smoothen the surface. Take a lint roller or vacuum cleaner and wipe it over the rug to remove the loose fibres.
Conclusion
Tufting a rug is a fun and creative craft where you can make functional and beautiful art that can be used in every home. With the right tool, proper materials, and correct procedure, rug tufting for beginners can make a perfect rug.
Sneagear is the leading brand that offers vibrant and themed rugs that perfectly fit any space. Our rugs are stylish and durable that enhance the appeal of any space!